So, I’m always looking for ways to save money – for ways around not having to buy expensive products when there is alternative. I have the Berry Basket Die on my wish list and told myself that I will buy it if and when it goes on clearance (which is probably never going to happen). I watched some videos yesterday and found that there are people out there, like me, who don’t want to buy it, but love the idea. I watched two videos and learned how to make the berry basket without using an expensive die. So I adapted my own version of it by incorporating what I learned from both videos. Credit information will be provided at the bottom of this post.
Lets get started, everyone! The first basket I made is using the directions from Elaine Jackson’s video, but I added the slits on the basket – and idea I got from Lourdes Collazo’s idea. Without confusing you, here are the pictures:


Once assembled, you get this:
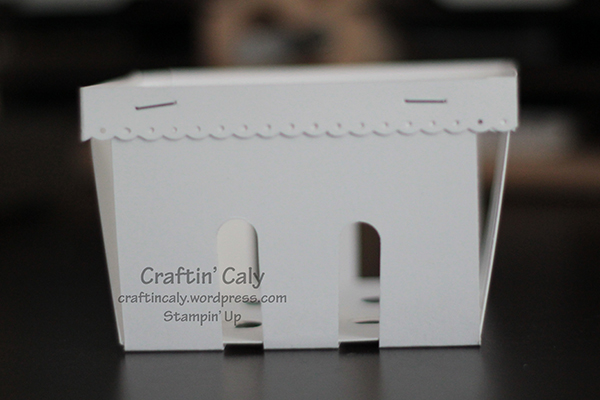
I must’ve messed up somewhere because the top isn’t exactly level…but isn’t it adorable??? So I messed around last night and came up with my own template and instructions to make this. Here it is!
1) Cut two strips off the short end of an 8.5×11 piece of paper that are 5/8” wide (easier than cutting a 1.25” strip in half as instructed in Lourdes’ video).
2) Turn the paper and cut two strips that are 3.25” x 9.75”
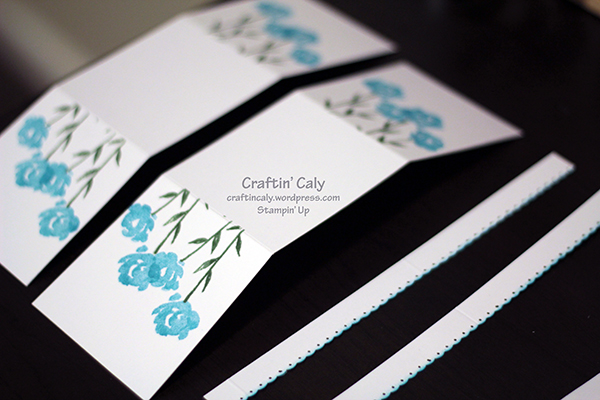
This is what your paper will look like once you’ve made all your cuts:

3) Trim (the two thin strips to the right of the photo above): Score at 4″ and 8″ and punch/cut a scalloped edge, if desired.
4) Basket (the two thicker pieces at the bottom left of the photo above): Score at 3.25″ and 6.5″
5) Flip and score “center box” at 1/8” from the outside from the previous score lines.
6) Mark from the 1/8” score mark to the outer corners and cut off. This step is not required, but I think it gives the berry box a more angled look.
You can see what I mean in this photo – The bottom panel is cut and the top panel is not.

7) Use a Word Window Punch and cut out basket slits, if desired on the basket pieces. I did this on the first basket prototype that I did, but opted not to do it on this basket.
8) Stamp the basket and assemble…then add any embellishments you wish and you’re done!
I decided to stamp some flowers using my Painted Petals set in Garden Green and Tempting Turquoise. I also punched a scallop edge on the trim and sponge-inked the edges and ended up with this:
Assemble by lining up the center squares and adhering with a strong adhesive. You can use adhesive for the trim too, but a mini-stapler is great and gives it a rough look.

OOOO….AWWWW…..isn’t it cute??? So glad I found those videos!
To give these clever crafters some credit, here is the info to the original videos and their blogs:
Lourdes Collazo:
Video: https://www.youtube.com/watch?v=_fHMa6NURkc
Blog: http://www.creativecraftsniche.blogspot.com
Elaine Jackson:
Video: https://www.youtube.com/watch?v=1kKXkZ1iF9A
Blog: http://papercraftbutton.blogspot.com/2015/01/berry-basket-perfected.html
Thank you ladies, for the inspiration.


So Cute!
LikeLike
Ooo! Nice work making it your own!
LikeLiked by 1 person