HI friends!
I have a masculine card to share today – featuring the new ink Trio from the Simon Says Stamp Celebrate release. Trio 25 includes Sky, Dusk, and Heather inks. These colors are perfect for a masculine card!
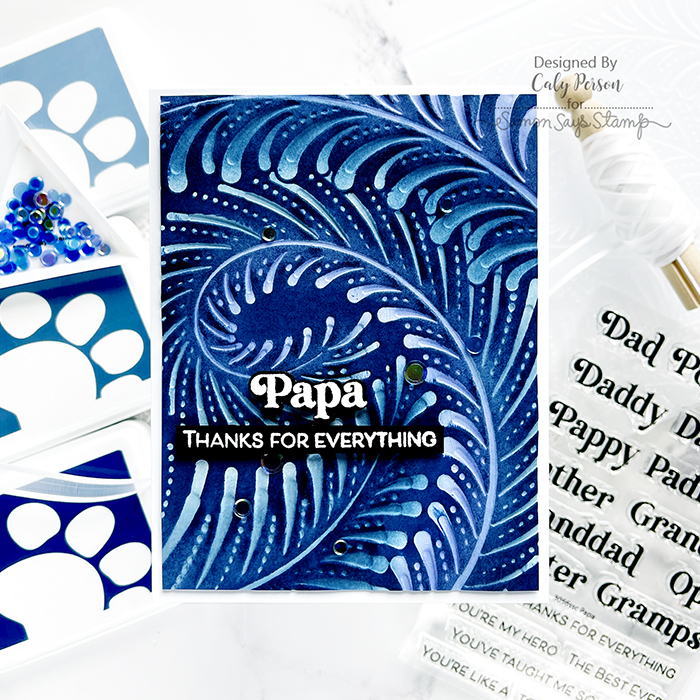
I loved trying the technique of coloring the debossed side of an embossed panel on my Chelsea Floral card and wanted to do it again using the Feather Spiral Embossing Folder. I used a blending brush to ink-blended an array of colors using Heather, Sky, and Dusk for the feathers. I went in that order, going from dark to light for each side of the feathers to create this really cool spiral/ombre effect.
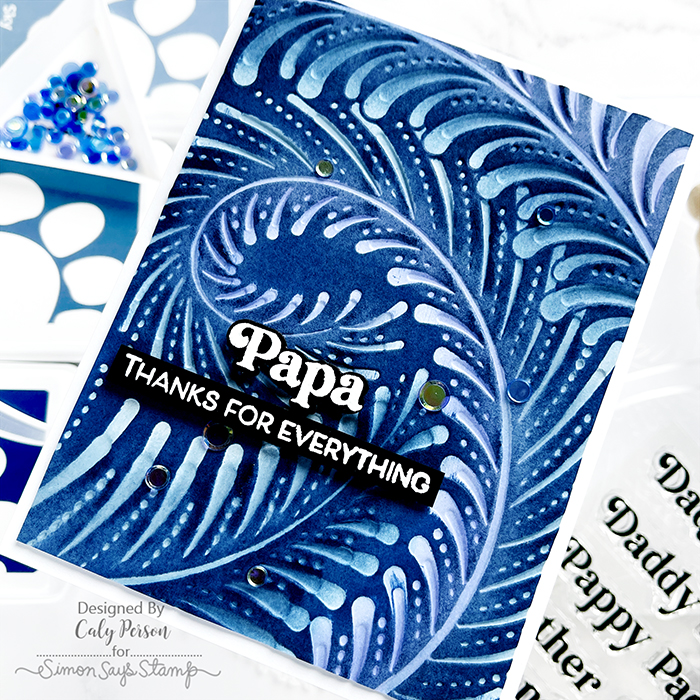
Then using the darkest color, Night, I swiped the ink-pad gently across the panel. Since I ink-blended on the de-bossed side of the panel, only the negative space is raised so it captures the “background” perfectly! You want to swipe – not press! You don’t want the ink to pool into the de-bossed areas. I finished by using sentiments from the Papa stamp and die set. I couldn’t help but also add a few coordinating confetti from the Dusk Embellishments mix.
I hope you enjoyed this project! Thanks so much for visiting!

SUPPLIES:
*NOTE: Affiliate links may be used (at no additional cost to you) – thank you for your support! To find out more about how affiliate links work and the companies I’m affiliated with, please check my Shopping/Affiliate Disclosure Page.
 SSS Feather Spiral EF SSS |
 SSS Papa SSS |
 SSS Dusk Embellishments SSS |
 SSS PSI Trio 25 SSS |
 SSS Sky PSI SSS |
 SSS Dusk PSI SSS |
 SSS Night PSI SSS |
 SSS Heather PSI SSS |
MOST USED TOOLS:
 SSS Intense Black Ink SSS |
 Copic Sketch Markers SSS |
 Hammermill Color Copy Digital Cover 100lb SSS |
 Neenah Solar White 110 lb SSS |
 Black Cardstock SSS |
 MSP MISTI Teal SSS |
MSP Mini MISTI SSS |
 MSP MISTI Mouse Pad SSS |
 Wagner Heat Tool SSS |
 SSS Brush Powder Tool SSS |
 3D Foam Strips – Black SSS |
 3D Foam Strips White SSS |
 SSS 3D Foam Squares White SSS |
 SSS 3D Foam Squares Black & White SSS |
 SSS Craft Tacky Glue SSS |
 AG Ultra Fine Metal Tip Applicator SSS |
 GKD Fine Tip Bottles SSS |
 Fiskars Titanium No5 Micro Tip Scissors SSS |
 SSS Fine Detail Scissors SSS |
 SSS Pawsitively Everyday Scissors SSS |
 SSS Magnetic Glass Mat SSS |
 SSS Stamp and Stencil Mat SSS |
 SSS Pawsitively Everything Tool (PET) SSS |
 SSS Blending Brush Set Small & Large SSS |
 SSS Small Blending Brushes SSS |
 SSS Large Blending Brushes SSS |
 ALT Scoring Board SSS |
 Teflon Bone Folder SSS |
 Pawsitively Everything T-Square Ruler SSS |
 SSS Reverse Tweezers SSS |
 Sakura White Gelly Roll SSS |
 IKS Square SSS |
 IKS Rectangle SSS |
 SSS Embellishment Wand Place and Pierce SSS |
DESTASH SALE!
If you’re interested in buying some lightly used or unused products in mystery destash boxes, please check out my Destash Sale Page!


Hi Caly, I specifically bought the SSS Feather Spiral embossing folder because I loved the card you created with it. I’m trying to figure something out however with your technique that isn’t working right. I THINK I may have stumbled upon the answer but wanted to check with you. Did you use very small blending brushes to get into the debossed feathers and then color them. Then after on the raised “background”, is that when you used your ink pad? Otherwise, if not I cannot figure out how you got the feathers colored in the ombre effect because if I just ink blend the entire panel after it’s been embossed, then it doesn’t work right. I’d so appreciate the help. Thanks much!
LikeLiked by 1 person
Hi Patti! Yes! That’s how I did it! You can also reference this video: https://youtu.be/emakVbRDYkY?si=d5_K4EqMMFTAWfRr
LikeLike
Hi Caly, I just sent over a reply but not sure it went through. Thank you for answering my question. I just went to view the video you referenced and remembered that I’d seen that a couple weeks ago. That’s what I tried with this Feathered embossing folder but it didn’t turn out too well so I gave up and ended up ink blending a plain white panel with three different shades of blue, then I embossed the cardstock with the Feathered embossing folder. Then I ran my Versamark ink pad over the raised portions and blended my gold Perfect Pearls onto it. It turned out really pretty! I will have to give your technique another try in the near future.
Thank you again for responding. Looking forward to your future creations. You’re one of my favorites for inspiration (and learning!)
LikeLiked by 1 person
Your card sounds gorgeous!! I’ll need to try it with perfect pearls-they don’t get used enough in my craftroom!
LikeLike
Same here. I haven’t used mine in about two years………just decided to go for it on a whim! LOL
LikeLiked by 1 person
Great idea!
LikeLike