Hi friends!
I’m so excited to share today’s project with you! Sometimes, I spend a lot of time on projects that are just for me. In the past those projects have included cross-stitch, crochet, quilting, sewing, etc. They’re labors of love, but but that love and appreciate for the project is returned for years to come.
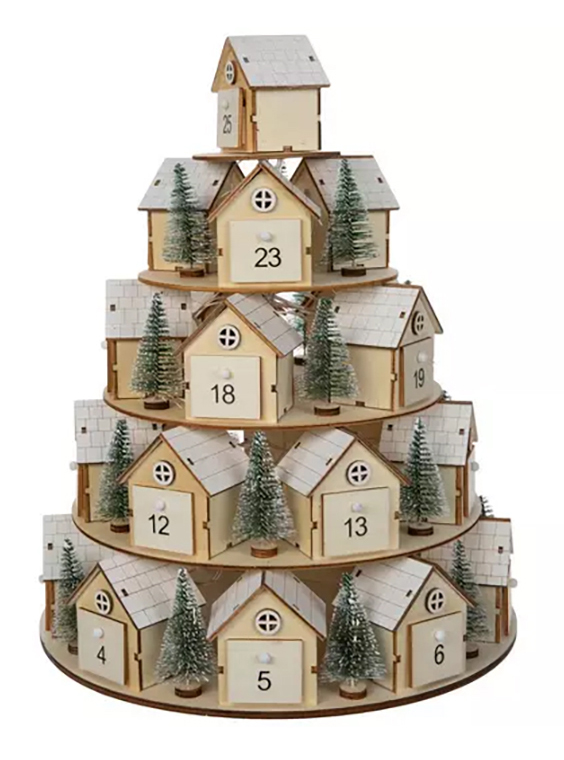
This idea came to me from a friend who shared this Instagram post from @thecraftpatch. I loved the project so much, that I sought out to find the Village Advent to decorate my own.
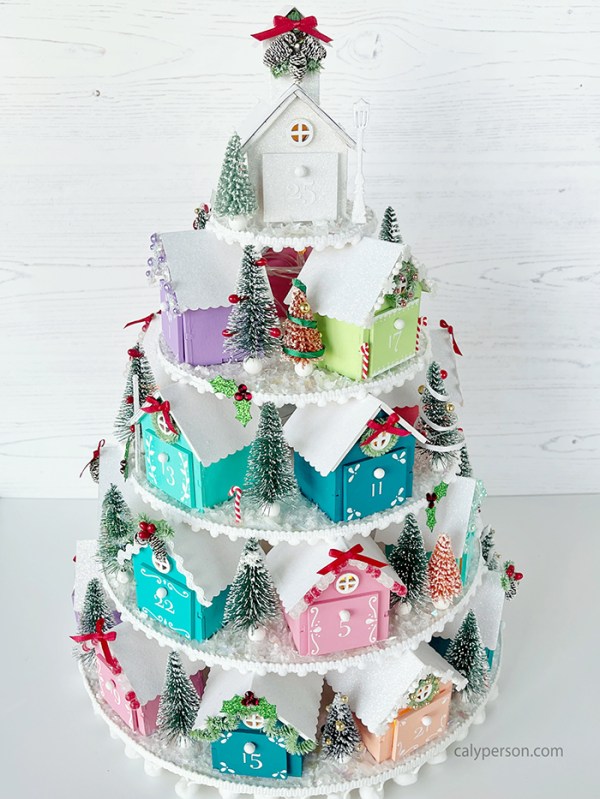
This Village Advent comes as an unfinished wood rotating advent calendar with unpainted houses and frosted bottle brush trees. Here’s a look at the untouched project:
I’m not sure if they are still available in stores, but I recommend calling your local store(s) to find out if they have any in stock. Just this week, I saw someone returning one as I was waiting in line to check out – you might get lucky! Full disclosure – this is a BIG project. I spent a bit of time each weekend over several weeks.
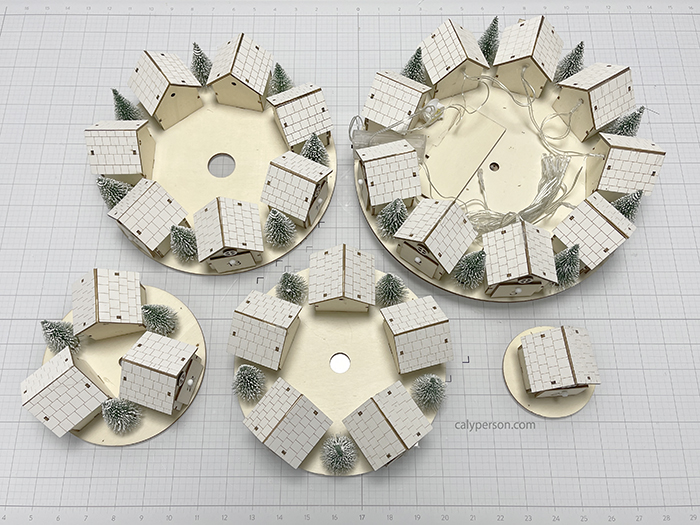
To start, I recommend taking the tiers apart. To do this, I took a heat tool to each of the roofs and heated them up to loosen the glue and carefully pulled each tier a part. The lights are simply pulled out of each house and tier as I went. This makes it much easier to paint. Regarding the bottle brush trees – you can bend them out of the way to paint, but I recommend taking these off, too. My son helped me pry them off using the same heat method as above. They’re harder to take off than the tiers, believe it or not. Many of the tree bases didn’t make it (that’s why beads are in their place on my project). My friend was smarter because she just twisted the trees from their bases. Be smart like my friend.
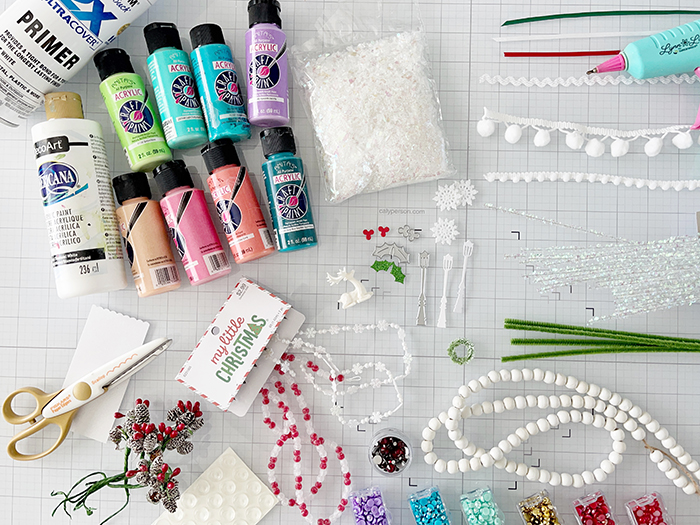
Next, plan and purchase your supplies. Nothing like going to the store 5 times, right? Thank you to Jennifer from @thecraftpatch for her blog post who shared a photo similar to what I shared above with her supplies. It definitely guided me in the right direction. I didn’t do my village advent exactly like hers and because I’m a paper-crafter, I used lots of supplies and tools from my paper-crafting stash (all linked below).
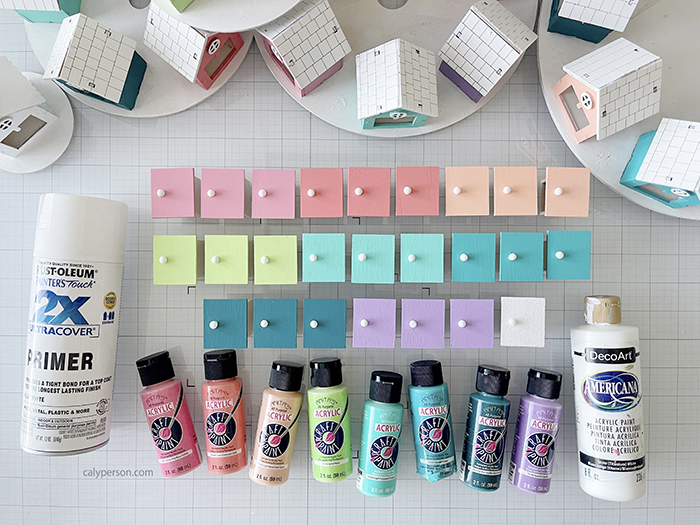
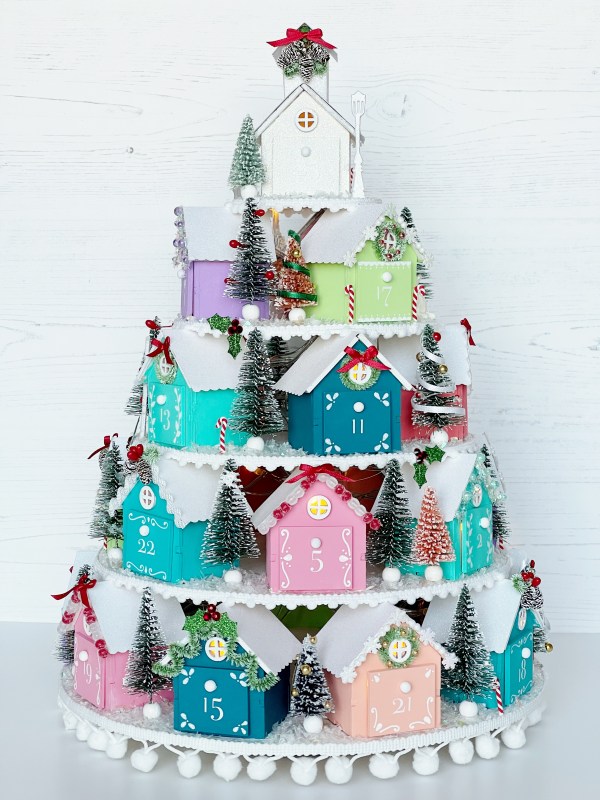
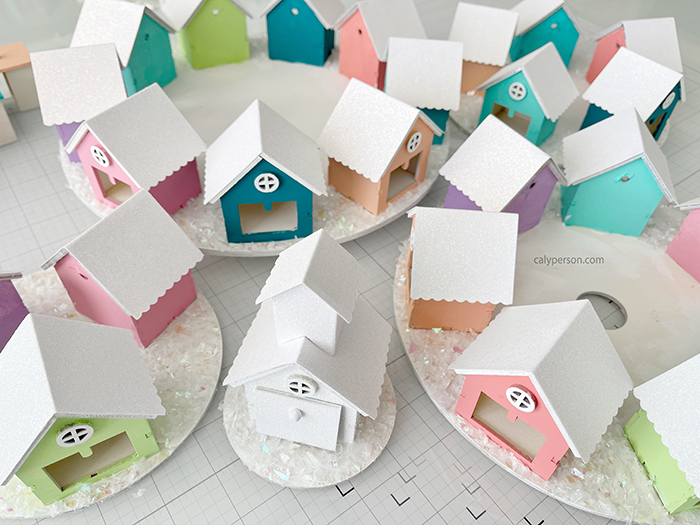
Next, spray your houses and drawers with primer – this will save you a lot of time with painting. My darkest color seemed to require more coats than the rest. I decided to paint the church at the top white. That takes the number of houses down to 24 – so choosing 8 colors of paint made it easy to divide up between the remaining houses. The colors I used in Anita’s Acrylic Paints are (from left to right): Taffeta Pink, Coral Cove, Light Coral, Sorbet, Light Turquoise, Hawaii, Deep Blue, and Hyacinth. After painting the church white, I glittered it while the paint was still wet. It matched the white glitter cardstock that I used for all the roofs perfectly. I used a pair of scallop scissors to cut the roof lines for a decorative edge – totally optional! You could just paint yours. I made the church top with white glitter cardstock as well.
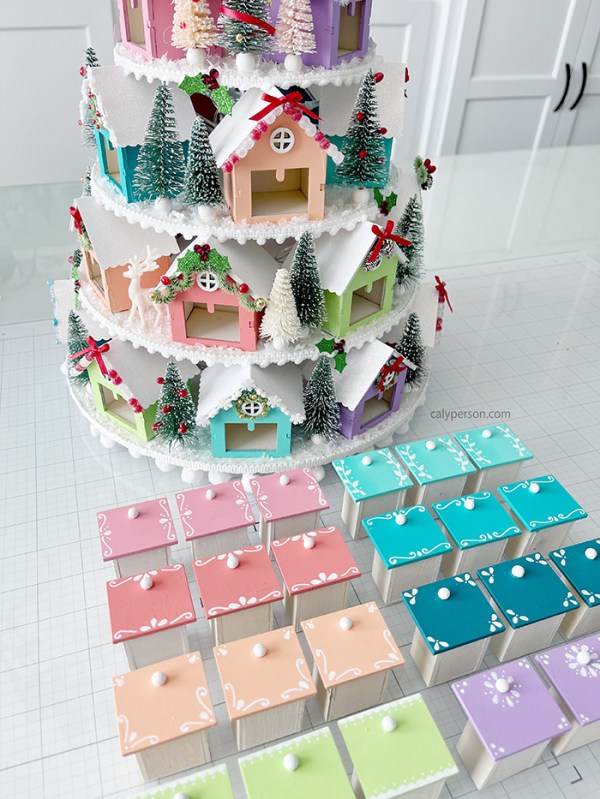
Next, I added snow to the tiers. I just did the front and sides of the houses since I knew it would barely be visible once all the decorations were in place. I did have to pull some off in front of the houses to help the drawers fit better, but I wanted some there to start (less work than adding snow later).
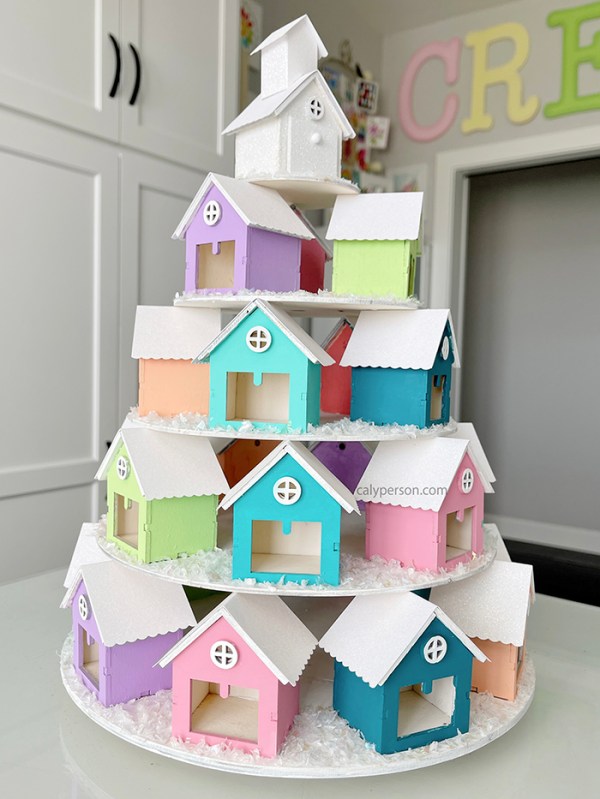
Once it was all dry, I stacked the tiers, rewired the lights as I went, and glued the tiers back together with hot glue. At the very bottom of the village advent is a wooden lazy susan. I added some silicon feet to them – this gives the whole thing better grip and raises it just enough for me to adhere the light’s battery compartment to the bottom of the last tier so I can hide the battery pack behind the pom-pom trim. I added a smaller pom-pom trim to the other tiers, too.
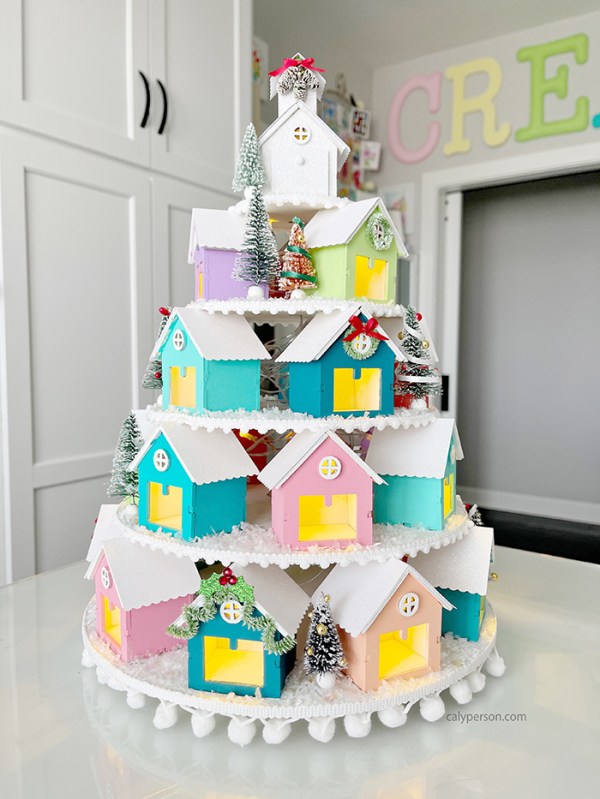
I have to give credit to my 15 year old, Evan, who helped me decorate a lot of the trees on this project. It was his idea to replace the damaged tree bases with the beads. The rest of the project was so much fun for me – making wreaths from chenile stems, glittering plastic deers, die-cutting holly and lamp posts, making tiny bows, etc. – ALL the things – to decorate each house and filling in open space. I know Hobby Lobby has pre-made wreaths, but they are too big. The ones I made barely fit – take it from me. I LOVED creating my own little holiday clusters with the pinecones and decorating the roof elevations with different supplies.
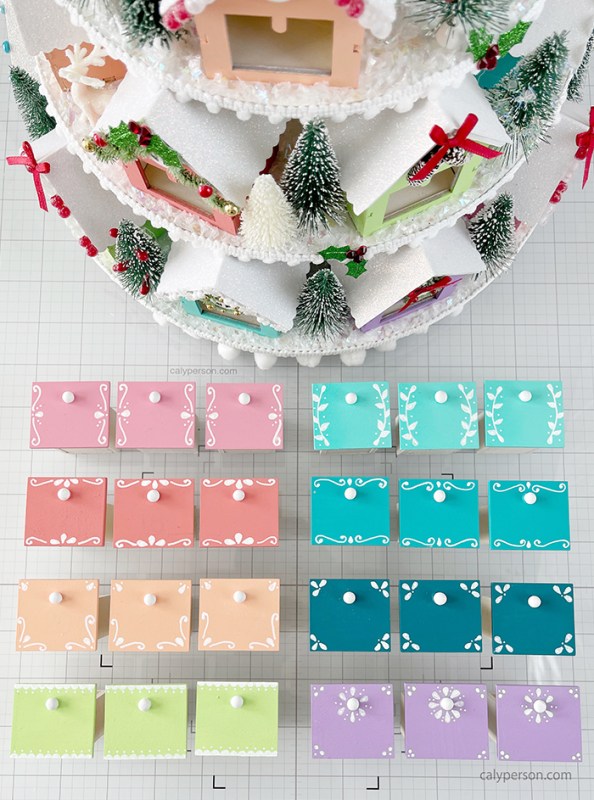
After all the houses and trees were decorated, I worked on adding decorations to the drawers. I hand-drew the decor with a nordic feel like Jennifer did. I used a Posca Paint Pen, but any white gel pen will work also.
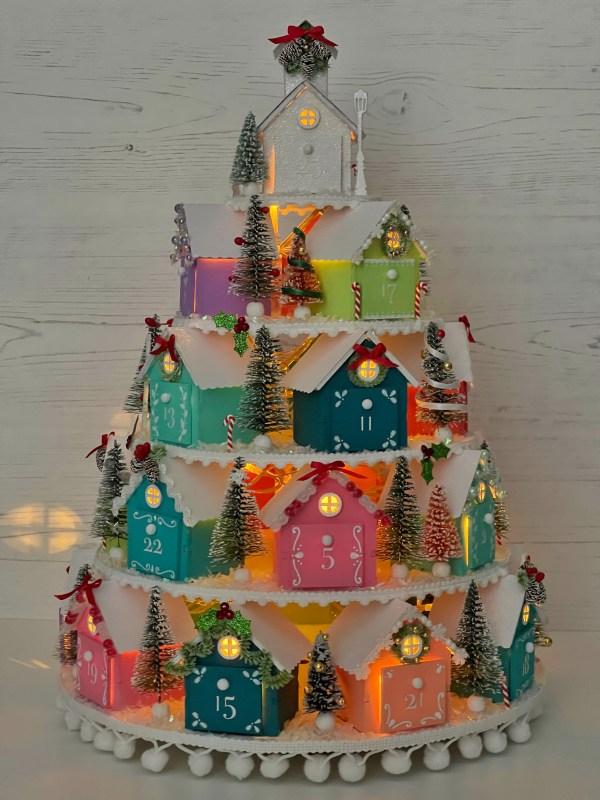
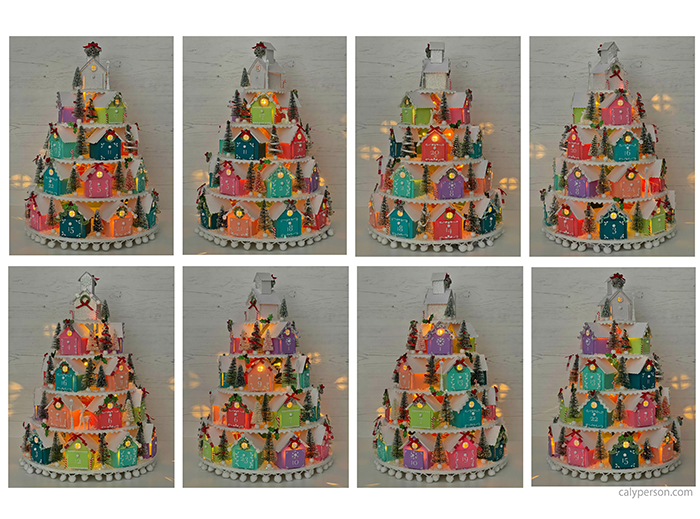
I can’t tell you how excited I was at this stage – all I had left to do was to add numbers to the drawers. The original village advent had numbers in order from the bottom up, but I mixed it up – makes it more fun to spin the village advent to look for the next number in the countdown to Christmas! The numbers I used are vinyl numbers I cut with my Scan N Cut 2, but you can buy stickers or hand-paint them. The finished project makes my heart sing! Here are photos side by side with natural light and with the lights off (I closed my shutters).
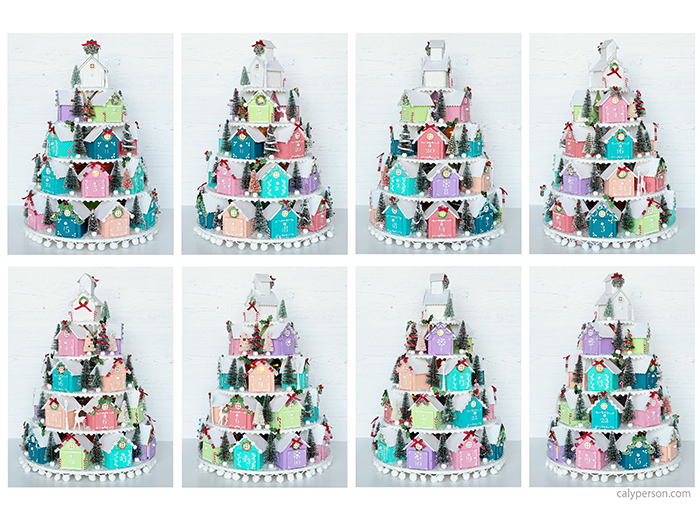
I don’t have the ability to share a non-YouTube video on my blog, but here are collages of the project from different views as it is turned:
This truly will be a project cherished for years to come and I’m so excited about it! I hope you like it!
I have another prop that I made to use on this village advent, but ended up not using it because the proportions didn’t feel right, but I still love them, none-the-less! These make for great decor on their own. I decorated Tim Holtz’s Santa Mugs and Christmas Confections (peppermint candy and sticks) by glittering them up with Distress Glitter. Next, I added 1″ styrofoam balls to fill the base of the mugs. I added paste with a palette knife to mimic whipped topping.
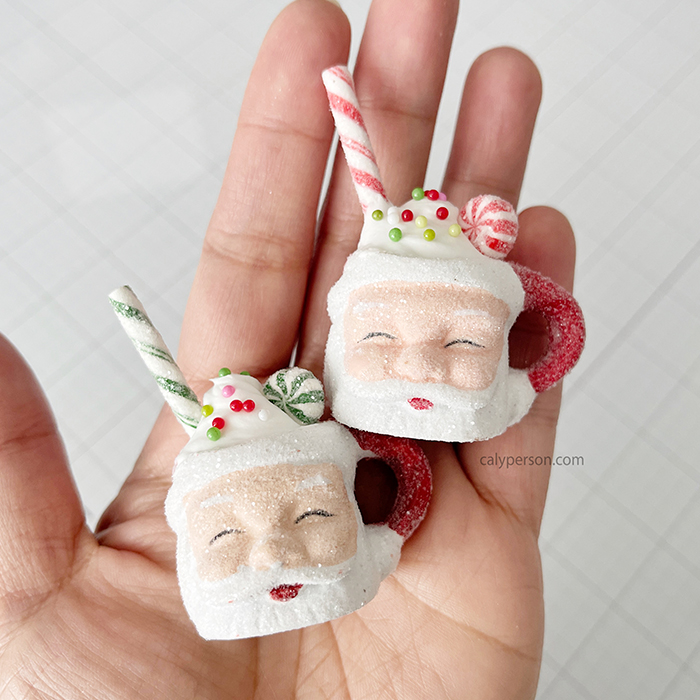
While the paste was still wet, I added my peppermint candy and stick to each mug and finished by sprinkling some glass seed beads on top. That’s it! This project took me maybe 15 mins to make – super quick and soooo easy!
I hope you enjoyed this project! Thanks so much for visiting!

SUPPLIES:
*NOTE: Affiliate links may be used (at no additional cost to you) – thank you for your support! To find out more about how affiliate links work and the companies I’m affiliated with, please check my Shopping/Affiliate Disclosure Page.
 TH Sizzix Vault Christmas Magic SSS |
 LF Magic Iris Holly Wreath Add-On SSS |
 TH Idea-ology Christmas Salvaged Reindeer SSS |
 TH Idea-ology Christmas Candy Confections SSS |
 TH Idea-ology Christmas Santa Mugs SSS |
 PPP Berry Bright Shaker Beads SSS |
 PPP Metallic Gold Pearls SSS |
 PPP Ruby Red Pearls SSS |
 PPP Cherry Red Pearls SSS |
 PPP Sea Foam Pearls SSS |
 PPP Pacific Blue Pearls SSS |
 PPP Lilac Pearls SSS |
 SSS Cherry Dazzling Gems SSS |
 SSS White Glitter Cardstock SSS |
 SSS White Glitter Cardstock SSS |
 SSS Glitter Cardstock Christmas SSS |
 SSS Glitter Cardstock SSS |
 SSS Lipstick Red CS SSS |
 Distress Collage Medium Matte SSS |
 TH Distress Glitter Clear Rock Candy SSS |
 Surebonder Glue Gun H-270 SSS |
 Surebonder Mini Glue Sticks SSS |
 1 inch Styrofoam Balls SSS |
 Ranger Heat It Craft Tool SSS |
 Wagner Heat Tool SSS |
 Uni POSCA xFine White SSS |
 Sakura White Gelly Roll SSS |
 TCW Light & Fluffy Modeliing Paste SSS |
 TH Palette Knife 2pk SSS |
MOST USED TOOLS:
 SSS Intense Black Ink SSS |
 Copic Sketch Markers SSS |
 Hammermill Color Copy Digital Cover 100lb SSS |
 Neenah Solar White 110 lb SSS |
 Black Cardstock SSS |
 MSP MISTI Teal SSS |
MSP Mini MISTI SSS |
 MSP MISTI Mouse Pad SSS |
Wagner Heat Tool SSS |
 SSS Brush Powder Tool SSS |
 3D Foam Strips – Black SSS |
 SSS 3D Foam Strips SSS |
 SSS 3D Foam Squares White SSS |
 SSS 3D Foam Squares Black & White SSS |
 SSS Craft Tacky Glue SSS |
 AG Ultra Fine Metal Tip Applicator SSS |
 GKD Fine Tip Bottles SSS |
 TH 6.75 Inch Mini Recoil Snips SSS |
 SSS Fine Detail Scissors SSS |
 SSS Pawsitively Everyday Scissors SSS |
 SSS Magnetic Glass Mat SSS |
 SSS Stamp and Stencil Mat SSS |
 SSS Pawsitively Everything Tool (PET) SSS |
 SSS Blending Brush Set Small & Large SSS |
 SSS Small Blending Brushes SSS |
 SSS Large Blending Brushes SSS |
 SSS Scoring Board SSS |
 Teflon Bone Folder SSS |
 Pawsitively Everything T-Square Ruler SSS |
 SSS Reverse Tweezers SSS |
Sakura White Gelly Roll SSS |
 IKS Square SSS |
 IKS Rectangle SSS |
 SSS Embellishment Wand Place and Pierce SSS |
 SSS Pawsitively Perfect Craft Tacky Mat 6.25 x 8.25 SSS |
 GKD Intri-Cut Die Cutting Machine SSS |
 GKD Intri-Cut Magnetic Platform Set SSS |
DESTASH SALE!
If you’re interested in buying some lightly used or unused products in mystery destash boxes, please check out my Destash Sale Page!


This is an amazing project! How long would you say you worked on it ? I read the description but I missed the # of hrs, if it was there. Also, what are the dimensions of the finished project? Beautifu!
Lori S in PA
LikeLiked by 1 person
I worked on it over several weekends. I’d say between 12-15 hours total. It’s about 12” wide and about 14” tall. I’m estimating without measuring at the moment. It’s not in front of me.
LikeLike
Ah… I figured it must be more miniature than I first thought. I thought it was 4′ high at first glance. I’m estimating… but it looked really big. Well, it sure is pretty!!
LikeLiked by 1 person
I’m dying to know; what do you put in your advent calendar? The ones we have contain parts of the nativity scene, but I know some people do candy or toys.
LikeLiked by 1 person
I’ve never had one with drawers before. We usually do the chocolate ones and plan on putting candy or little tiny toys in them.
LikeLike