Hi Friends!
I have a different project to share today – it’s not a card! I love 3D art and when I saw these Sizzix Thinlits dies, I chose my favorites – the Wild Peony and Ranunculus – to buy and create a bouquet. Before I dive in, I want to mention that this bouquet took me a few hours to create – there are lots of pieces to die-cut. My advice is to die-cut all your pieces before assembling. Assembling is always my favorite part!

Aside from the dies themselves, Sizzix Crepe Paper was used for these flowers. It’s moldable and easy to work with. This was my first time using crepe paper and I absolutely loved it. I think it’s easier to make paper flowers that are bigger in size with crepe paper, but you can also use regular cardstock as well! The Tim Holtz Shaping Kit is a great tool for cardstock paper flowers. In addition, the Sizzix Fold and Form Making Tool is a must have for easy curling – there is a slit in the tool (looks like a bone-folder) that helps clamp the paper for easy of curling, but you can use anything you might already have!
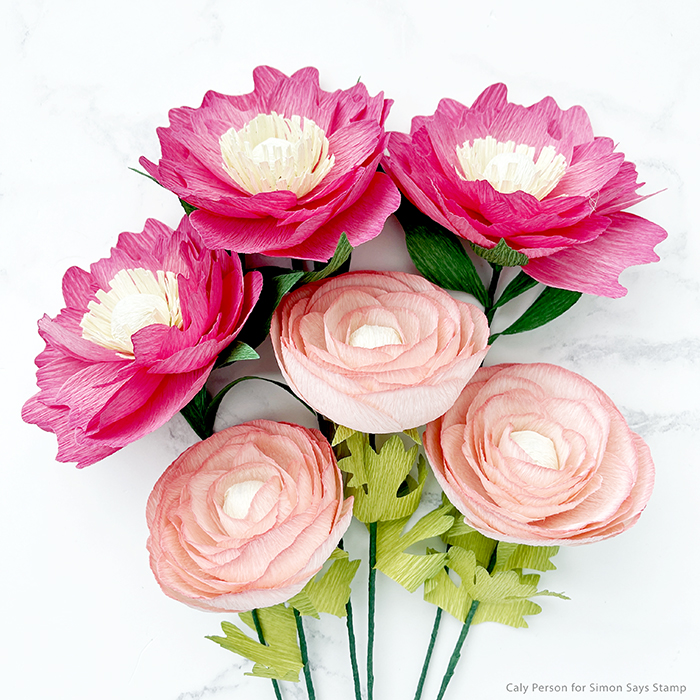
I worked on one flower type at a time, starting with the Wild Peony. I die-cut all the pieces and before constructing, I added Magnolia ink using a blending brush at the tips of all the petals. You also will want 1-inch wooden balls with 1/8″ holes, floral wire, and floral tape if you want to create a bouquet like I did. if you don’t want to buy wooden balls, you can also roll up paper to create a ball and cover it with yellow crepe paper.

The image above shows you how many times you should cut each piece. The “x” does not mean you will get that number of pieces – just that you should die cut them “x” number of times. Since there are 2 petals to each of the petal dies, you will end up double the number of petals for each cut. It is important to note that you should shape your petals before attaching them. After inking the petals, I recommend using the Sizzix Fold and Form Making Tool and/or Tim Holtz Shaping Kit to curl the petals. I also used my thumbs to stretch the centers of each petal to round them out.

To assemble, I used a pair of pliers to fold over one end of the floral wire about 1/4 inch and added hot glue into the hold of the wooden ball and attached the ball to the formed end of the wire. Once dry, I glued a round piece of yellow crepe paper over the ball to form the peony center.
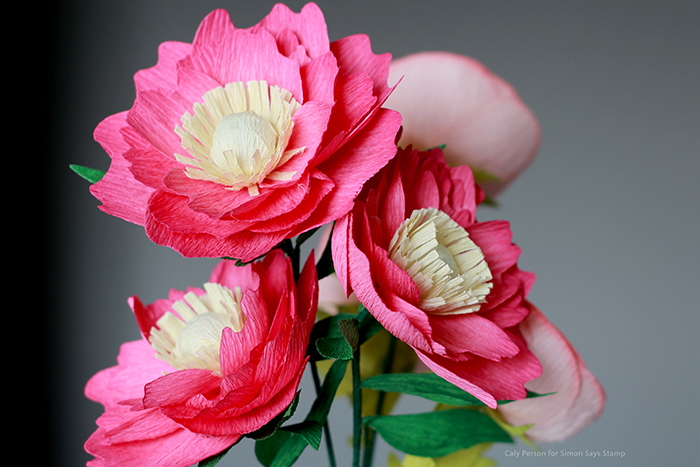
Next, I glued the yellow stamen, one at a time about 1/4 inch from the base of the ball or wire stem. The smallest petals are next – these are the two petals that are joined at the center. Using the mat from the Tim Holtz Shaping Kit, I pierced a hole at the center of these, to feed the petals through the wire to attach them to the base of the flower, criss-crossing them to space them out evenly. You can flip the flower over at this point and work with the flower sitting on your desktop to attach the medium petals. Keep rotating to get the petals evenly dispersed, then work on attaching the larger petals until you finish.

For the Ranunculus flowers, I used a softer pink and inked the petals with Teeny Bikini ink. I also used a lighter green crepe paper and inked the sepal (base of flower) and leaves with Beanstalk Green ink. The Ranunculus will be assembled in the same manner to start – add stem to wooden ball and cover with yellow crepe paper.

There are no stamen for the Ranunculus flower, so after the stem is prepared, I started with the smaller petals, then the medium, then the large petals. Again, after inking the petals, I recommend using the Sizzix Fold and Form Making Tool and/or Tim Holtz Shaping Kit to curl the petals. I also used my thumbs to stretch the centers of each petal to round them out. Adding glue to the bottom 1/3 of each petal, work your way around the base of the flower and evenly disperse the petals to form the flower.

At the base of the Ranunculus, you’ll add the sepal (star piece) to finish it off and hide the petals at its base. Pierce the center of the piece to feed the wire stem through to adhere it at the base of the flower.
To finish off all of the flowers, I started at the base of the flower and wrapped the entire stem with floral tape, adding leaves as I went down – location is up to you! I wrapped until I reached the bottom and then clipped the stems off at the desired length using wire snips.
Phew! Such a long post, but I hope you enjoyed seeing these flowers and learning about the details! They were really relaxing to make and I enjoyed it so much! I hope you’ll give them a try!

SUPPLIES:
*NOTE: Affiliate links may be used (at no additional cost to you) – thank you for your support! To find out more about how affiliate links work and the companies I’m affiliated with, please check my Shopping/Affiliate Disclosure Page.
 SZ Wild Peony Thinlits SSS |
 SZ Ranunculus Thinlits SSS |
 SZ Crepe Paper – Serenity SSS |
 SZ Crepe Paper – Splash SSS |
 SZ Crepe Paper – Vintage SSS |
 Sizzix Fold and Form Making Tool SSS |
 SSS Magnolia Ink SSS |
 SSS Teeny Bikini Ink SSS |
 SSS Beanstalk Green Ink SSS |
 SSS Rainbow Pack Blender Brushes SSS |
 TH Sizzix Shaping Kit SSS |
 Surebonder Glue Gun H-270 SSS |
 Surebonder Glue Gun Stand SSS |
 Surebonder Mini Glue Sticks SSS |
 SB Platinum 6 Die Cutting Machine SSS |
 Sizzix Sidekick SSS |
 LF Stamp Shammy SSS |
 Fiskars Titanium No5 Micro Tip Scissors SSS |
DESTASH SALE!
If you’re interested in buying some lightly used or unused products in mystery destash boxes, please check out my Destash Sale Page!


Absolutely beautiful, and your photos are incredible!
LikeLike
Thank you!!
LikeLike
I can’t tell you how much I appreciate this post! I’ve been going crazy over these flowers but have yet to find a video or tutorial that helps me understand the top-to-bottom assembly. I would love to see the backs of your flowers (the underside). TY, TY, TY!
LikeLiked by 1 person
Oh, and just so you know, I’ve pinned photos from this post about 4x! The info you share is that valuable to me!
LikeLiked by 1 person
I’m so glad you found it helpful. Thank you!!
LikeLike
Oh, Caly, how beautiful. I love stuff like this. So gorgeous! You are awesome, girlfriend. 💜
LikeLiked by 1 person
Thank you!!
LikeLike
Wow, when I first saw the picture, I jad no idea they were not real flowers! Amazing work on these, just beautiful.
LikeLiked by 1 person
Beautiful flowers. I bought some dies to make flower ,but have not try them . Now that I see yours I will have to try. Thank you for the great tips.
LikeLiked by 1 person
You’re welcome! Thanks for visiting!
LikeLike